HP laserjet P3015 No IP Address


HP laserjet P3015 No IP Address


     I've a problem with printers on our network.It's set right now for DHCP. But I also set it in Bootp as well as manually setting an IP and none of it seems to work. In the display it says that the IP is 172.22.41.55 which is fine except when I print out a page with all the information it has 0.0.0.0 for the Ip Address, Subnet Mask, and default gateway. As well as saying "Initializing" for it's status under the IPv4 list. I trying to connect with a USB but appearently no computer can print to it even with the USB cord and having just installed the drivers from the disc.

    Formatters on the P3005/P3015 are notorious for a bad chip on them. Chinese junk. I have had luck with reflowing the solder on them with a hot air rework gun but for the average user replacement of the formatter is easiest and surest cure. 

     First thing to try is flashing firmware as on the newer crap HP is putting out the firmware has cured many problems. The newest 07.050.8 from May 18, 2010. Print a config page and look at the firmware version. Flash it offline with usb direct to an unshared PC with the NIC disconnected and be patient as the firmware affects more than one board in the newer machines. If it works you are good. If it doesnt then formatter is next - but if you get a new formatter be sure to reflash the firmware so all boards are at the same version and up to date with the newest. 

    If no luck the formatter for the network version of the P3015 that includes the embedded network interface the part number is CE475-69001. You can check the HP Parts Store but you may try Colleen Longseth at Liberty Parts Team (lbrty.com) for pricing and availability of refurbs and if none see what the new pricing is. They generally beat HP list pricing and shipping is quick and reasonable. 

     You might also try to disable the internal NIC and see if USB works. The Jetdirect, whether embedded or an MIO or EIO add on, can cause all sorts of weird stuff if they go bad. If memory serves me you wait till the memory check starts and press and hold the checkmark button till the lights all come on steady then let go. When the menu selection comes up scroll through and there should be a disable internal (or embedded) NIC. Once the machine goes to ready you should get a config page that does not include the network info pages. Hook up USB, load the drivers for DOT4 and try it out. If no joy then something major is bad on the formatter. 

    The formatter is pretty easy to replace but be sure to print a config page to have serial and page and maint counts so you can reload them. Get a service manual, should be one for free on feedroller.com (look down the left nav bar near the bottom) and also go to printertechs.com for the service PIN so you can access the service menu items to load the serial, page and maintenance counts. 

   The formatter is the brain. It takes input and sends a converted printjob to the applicable boards such as the laser scanner and DC controller. On yours it also has the inputs (USB and ethernet in this case) so if they fail you replace the formatter.

    If you still can't solve this problem. maybe it's cable got damaged and you should replace other new cables. I believe the problem will stopped occurring. I know this is an old message but hopefully will help someone 


What color laser printer can cheaply be refilled with non-OEM toner?

Q: What color laser printer can cheaply be refilled with non-OEM toner?


    For years, I bought the Costco HP inkjets which required ink priced at
about 100 times what ink 'should' cost. I even tried the Costco $20 ink
refills, but of course, HP makes refills almost impossible, on purpose,
so I simply vowed to never buy another HP ink-based printer.

    I bought an HP B&W laser printer, and have happily and successfully been
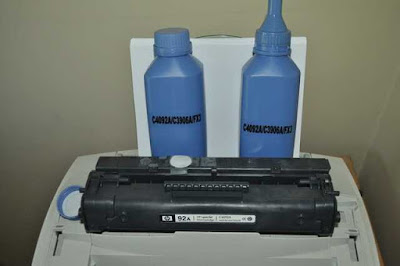
buying $5 guaranteed-used-once C92 cartridges and refilling the C4092A
black toner over the years at home, for about $5 for 250 grams of toner as shown below (after melting a circular hole in the toner cartridge):


    I never again wish to go through the expensive ink-refill sheer hell of
the typical HP inkjet ... so the 'only' color printer for me is one which
I can easily and inexpensively refill, at home, from non-OEM sources.

    Hence my question:

Q: Do you know of a color laser printer that can be as easily refilled from non-OEM sources like the B&W laserjets can?

   although I never refill. I Buy non-original ink cart. on eby. Have not had any trouble printing text or photo. Ink jet is HP 3200m.

   The HP cartridges I had were actually tanks with sponges in them.
   So, you had to not overfill them, or they leaked.
   But you had to fill them before they went too dry or they leaked.
   Plus you had to drill the hole in the right spot or they leaked.
   Even so, you had to deal with the time stamps that they burned into the ink tank at the factory. There was no way around that.

   You 'could' get past the time stamps they put in the printer memory for the cartridge. I tried the CMOS battery trick and shorting a pin on the motherboard ... but what worked best was to have THREE cartridges because the printer would only remember the unique id of the last two!

   But all that effort simply turned me off because HP made it difficult on purpose to refill the ink in the ink tanks.

   Note: Technically, these weren't cartridges because the ink jets were separate from the ink tanks in my HP all in one printer.

   have to say, refilling the HP 3200m laser printer is as KISS as it gets!

  1. You buy the soldering iron hole-melting tool (optional).
  2. You buy toner at the same time (about $5 for 250 grams).
  3. You melt the hole & pour in the toner.
  4. You put scotch tape over the hole!

  Total costs for, say, five years toner is something like:

  a) Original HP C4092A (92A) cartridge (about $40)

  b) Refills about every six months (about $5 each)

  c) Empty used-once cartridge every 2.5 years (about $5 each)

  Because of the ease of refilling, I LOVE my HP 3200m laser printer!

  Of course, if I go 'color', I'm assuming the refilling of the color laser printer will be as simple as the B&W is currently.

Xpress 2070F won't scan


Xpress 2070F won't scan


I have a multifunction Samsung printer (Xpress 2070F) whose scanner only outputs blank pages with dark streaks, exactly as if I had not placed an item (face down, of course) on the flatbed. I have installed the latest drivers for the printer and the scanner, and the latest versions of Samsung's Easy Printer Manager and Easy Document Creator software. The settings that control the printer and scanner options are correct. I have also tried the scanner with a connection to a different PC. Nothing works. Samsung tech support in Spain (where I live) helpfully suggests that I clean the glass of the flatbed!

check CIS unit is having light or not while movement (Unit which moves from one side to end of flatbed while scanning or doing photocopy)

then
go to tech mode
by pressing
Menu#1934 Menu

in tech mode

go to machine test -> shading test - > shading and print

check the values of

black, red, green, blue...
if its showing as OK otherwise CIS unit faulty and needs physical repair....

when running the shade test you need to put a piece of 90 bright paper into it. however this only fixes it if you have a dual scanner and one side isn't working. can you make copys or are they whit as well? odds are if they are white, then your scanner is just bust.

dual scanner means it scans both sides of the paper in 1 pass, but I just checked the specs and yours doesn't have that. It is defiantly a software issue go to

http://www.samsung.com/us/support/o...mono-multifunction-printer-xpress-w-fax-m2070

and grab
AUG 06,2015
Universal Scan Driver ver. V1.02.19, MULTI LANGUAGE

or you can go to www.Samsung.com/us/printersetup

before you do that make sure you remove your current printer. Samsung can and will remote in for you and do it as well.

You may try updating your firmware, and adobe. 

If not. hmm, that is a pickle. Samsung printers use a node type allocation system for their printer resources, so its possible it just has a bad sector in the hardware. Although, this would be exceedingly rare to fail in this way. Check Samsung.com


How to Configure Scan to SMB on a Samsung MFP

Windows 7 Home Premium/Samsung SyncThru Web Service 2.0
© Samsung Electronics, Inc. (11/2/10) Page 1 of 15
Configuring Scan to SMB on a Samsung Multifunction Printer (MFP) is a three-step process:
Step 1: Create a User Account for Scanning
Step 2: Create/Configure the Network Share
Step 3: Configure the MFP to use the Network Share
In the example, we will configure a network share on a shared workstation running Windows 7 Home
Premium. In this context, the term “server” will refer to the shared workstation.
Note: If you are planning to scan to an individual’s workstation instead of a shared workstation, Samsung
recommends using the Scan Manager software instead of configuring Scan to SMB. For more information on Scan
Manager, consult the User’s Manual that came with the MFP.
Create a User Account for Scanning
Example: Create a new user called “scanuser” on the server.
This account is used to authenticate access by the MFP to the server. It is not user or MFP specific. The
same account can be used to configure multiple network shares and multiple MFPs on the same server.
1. Click the Start Menu button.
2. Type “users”, in the search area.
3. Click “Add or remove user accounts”, under the Control Panel section, to launch the User Accounts
control panel.
© Samsung Electronics, Inc. (11/2/10) Page 2 of 15
4. Click the “Create a new account” link.
5. Enter the user account information, and then click the Create Account button to create the user.
User name: scanuser
User type: Standard user
Note: User name must NOT contain a space, or scan to SMB will not work.
Samsung Electronics, Inc. (11/2/10) Page 3 of 15
6. A password must be assigned to the scan user account. Click the name of the user, created in the
previous step, to edit it.
7. Click the “Create a password” link.
Samsung Electronics, Inc. (11/2/10) Page 4 of 15
8. Enter the password for the account twice, and then click the Create password button.
9. The password has been assigned to the user account. Click the close window button (x) to close the
window.
Samsung Electronics, Inc. (11/2/10) Page 5 of 15
Create/Configure the Network Share
Example: Setup Scan to SMB to scan to a destination folder named “Invoices” inside the folder
“Scan” on the server.
The path to this share will be Scan\Invoices
1. On the server root directory (e.g. C: Drive), create a new folder (e.g. “Scan”).
This folder will be the top level of our network share.  [SERVER IP]\Scan
2. Additional sub-folders may be created, but are not required. To create a sub-folder, open the folder
created in Step 1 and create an additional folder (e.g. “Invoices).
This folder will represent the second level of our network share.  [SERVER IP]\Scan\Invoices
Note: If you only plan to scan to the top level folder, you can skip to Step 3.
3. Configure the folder to be shared. Right click on the folder created in Step 1, and select Properties.
4. Click the Sharing tab.
5. Click the Advanced Sharing button.
Samsung Electronics, Inc. (11/2/10) Page 6 of 15
6. Click the checkbox next to “Share this folder”.
7. Click the Permission button.
8. You must explicitly assign permissions to this folder. Click the Add button to add a user.
9. In the “Enter the object names to select” text field, enter the user name for this folder (e.g.
“scanuser”).
Samsung Electronics, Inc. (11/2/10) Page 7 of 15
10. Click the Check Names button.
11. Click the OK button.
12. You must specify access rights to this folder. Select the name entered in Step 8 to highlight it.
13. Click the checkbox under the “Allow” column next to “Full Control”, and then click the OK button.
14. Click the OK button, to dismiss the Advanced Sharing window.
Samsung Electronics, Inc. (11/2/10) Page 8 of 15
15. Click the Close button, to dismiss the folder Properties window. The folder has now been setup as a
network share.
Note: You do not need to turn on sharing, or configure access, for any sub-folders that were created under the main
folder. Sub-folders will inherit the properties of their parent folder.
Samsung Electronics, Inc. (11/2/10) Page 9 of 15
Configure the MFP to use the Network Share
Enable SMB
1. To access the MFP’s SyncThru Web Service (SWS), open a web browser, and type the IP address
for the MFP.
2. Click the Login link.
3. At the Login window, enter the ID and Password, and then click the Login button.
Note: The default ID is “admin”, and the default Password is “sec00000”.
Samsung Electronics, Inc. (11/2/10) Page 10 of 15
4. Click the Settings link, and then select Machine Settings.
5. In the Settings pane, under the Scan section, click Scan to Server.
6. To enable scan to SMB, click the “Enable” checkbox next to “SMB Protocol”, and then click Apply.
Samsung Electronics, Inc. (11/2/10) Page 11 of 15
Add the Network Share to the Address Book
1. Click the Address Book link, at the top of the screen.
2. In the Address Book pane, click “Individual”.
A list of all individual Address Book entries displays. In SyncThru Web Service 2.0, all types of
destination addresses are listed in the address book. This includes Fax Numbers, E-Mail Addresses,
SMB and FTP Servers.
3. In the Individual Address Book pane, click the Add button.
4. The new address screen will display. Enter the information for the network share created in
“Create/Configure the Network Share” here.
Samsung Electronics, Inc. (11/2/10) Page 12 of 15
For a detailed description of each entry, refer to the table on the next page.
Note: To enter SMB address information, click the checkbox next to “Add SMB”. Scroll down to view all fields.
Samsung Electronics, Inc. (11/2/10) Page 13 of 15
General
Item Description
Name Reference name for this entry.
This is the name that appears on the MFP display.
Speed No. Index number for address book entry.
This number represents where this entry will appear numerically in the list of SMB
servers on the MFP display and address book list.
SMB Server
Item Description
SMB Server Address IP Address or Name (15 character NetBIOS name or DNS Name) of the server.
Using IP Address is recommended.
SMB Server Port Port number of the server.
Default port is 139 (NetBIOS Session/TCP).
Change the default port to 445 (SMB/TCP).
Login ID Anonymous
Enables anonymous login.
Anonymous login is not recommended (leave unchecked).
User Name
Name of the user granted access to the network share.
This is the user that was added in Step 8 of “Create Configure the Network Share”. User
name should contain alphanumeric characters (A-Z, 0-9) only and no spaces.
Password Password for user account.
Password should contain alphanumeric characters (A-Z, 0-9) only and no spaces.
Confirm Password Password for user account.
Enter password a second time. Passwords must match.
Domain Domain name for the server that contains the network share.
If the server is not on a domain, enter “WORKGROUP” in this field.
Path Path to the folder where the scans will be stored.
The path is comprised of the name of the top level folder created on the server in Step
1, “Create/Configure the Network Share”, plus any subfolders created. The format for
this field is “Top Level Folder Name\Subfolder Name” (e.g. “Scan\Invoices”). If no
subfolder exists, only the name of the top level folder should be entered (e.g. “Scan”).
Do not enter any other path information, such as a drive designator (e.g. “C:\”) or IP
address (e.g. 192.168.10.123).
Scan folder creating policy Create new folder using login name
If checked, a new folder is created on the server (subfolder of path) based on user
name.
Folder is created once after the first scan is initiated at the MFP. Default =Unchecked
Create new folder every (Day, Month, Year)
If checked, a new folder is created automatically based on the time interval
selected.
Folder name is in the format YYYY-MM-DD (e.g. 2010-10-21). Default =Unchecked
Create new folder only if scan output consist of several files
If checked, a new folder is created when the scan format selected results in more
than one file being created (e.g. Single page TIFF).
Folder name is in the format File Name+File Type+### (e.g. DOCTIF001).
Default =Checked
Filing Policy Default method for file naming.
Determines how the machine will handle a duplicate filename. Options: “Overwrite”,
“Cancel”, “Change Name”. If “Change Name” is selected, the name of the new file will
be changed to avoid overwriting an existing file. If “Cancel” is selected, the operation is
cancelled (file is not created). If “Overwrite” is selected, the existing file is overwritten.
Default=“Change Name”
Samsung Electronics, Inc. (11/2/10) Page 14 of 15
File Name Pre-fix added to each file name.
File Name is blank by default, but an entry is required. Enter any alphanumeric prefix
(e.g. SCAN, FILE, etc.) Files will be named using this prefix, and numerically
incremented to ensure uniqueness (e.g. SCAN0001, SCAN0002, etc.)
5. Once all entries are made, click the Apply button to save the information.
6. The Individual Address Book pane lists the new entry.
7. To confirm the SMB server was added correctly, click the Test button.
8. If the test is successful, click the OK button to close the test window. Configuration is complete.
Samsung Electronics, Inc. (11/2/10) Page 15 of 15
Note: If the test fails, click the OK button to close the test window. Then, select the address book entry, and click the
Edit button. Recheck all entries. Perform the test again. Consult the Troubleshooting section for more information.
Troubleshooting
If, after following the above instructions, Scan to SMB does not work check the following.
User Account (used for scanning)
 User name does not contain a space.
 Password is assigned to the user account. Password cannot be blank.
Share
 Explicit access rights (full control) for the share is assigned to the user account (used for scanning).
 Attempt to access the share folder from another PC. If the share cannot be accessed, there is a
problem with sharing, or it is being blocked by a firewall or anti-virus software. Add an exception to
the Windows Firewall, or other Firewall/Anti-Virus software, for TCP Port 445.
 If necessary, delete the entire share folder and recreate it.
IP Address
 Static IP address is assigned to MFP. Do not use DHCP.
SMB Setup (on the MFP)
 Use IP Address, instead of host name.
 Change the default port to 445.
 Make sure that “Path” exactly matches the path of the SMB Share. The path should consist of the
name of the root level folder, of the SMB share on the server, plus any subfolders. Format is
Top Level Folder Name\Subfolder Name (e.g. “Scan\Invoices”)
 If NO subfolder exists, under the root level folder of the SMB share, enter only the top level folder for
Path (e.g. “Scan”).
 Do NOT enter a drive designator (e.g. “C:\”) or IP address (e.g. 192.168.10.123) in Path.
 “User Name” and “Password” must exactly match the user name and password for the account
designated for scanning.
 If the server is not on a domain, enter “WORKGROUP” for the domain.


Xpress SL-M2875ND scanning resolution and settings


Xpress SL-M2875ND scanning resolution and settings


    I bought this printer a couple of weeks ago. Everywhere I look for the specs, the resolution of the scanner is specified as 1200x1200dpi optical. However after installing all of the drivers/software that's available for it, I could only find 600dpi as the maximum.

    On Samsung's helpdesk, I was told that the "printer driver" only supports max 600dpi and to use higher I have to use the "twain driver" with software that supports it. How is it possible that Samsung doesn't include software capable of utilizing the most of the scanner? They've included a ton of crap!
  Okay, so I've tried VueScan first, couldn't get higher than 600dpi. Next I've tried IrfanView, using which I actually did get to a dialogue/window where it was possible to set the resolution to 1200, 2400 and even 4800dpi.

    But it is unusable. If I select anything up to 600dpi (included), the picture is nice and the colours are balanced. If I select anything higher, the resolution is higher, but the colours are atrocious. It's like the contrast, brightness and gamma settings are horribly misconfigured that the image is just looks burnt. It's impossible to manually set it up so that it comes anywhere near the quality of the default scan at 600dpi. It almost seems like the manual adjustments are ignored.


    The Easy document creator is limited for 600 dpi.. 

    Use older software 'Scan assistant' for windows to get the more dpi in scanning


Flashing red LED.


Flashing red LED.


Xpress M 2835 DW printer.

Printer works OK.The LED flashes all the time.

When I press the Blue on/off button (and it goes off) the status screen shows:- "Prepare new imaging unit" with the red LED still flashing.When the Blue on/off button is on the status screen shows "Sleeping" and the red LED is flashing.

Toner status is OK at all times.The only slight problem is when printing envelopes, it sometimes takes a few tries to get it right.....


This is just because your printer's imaging unit is about to expire and its warning before expiry.


if you want to disable this Install Easy printer manager (As your printer is non display printer) and go to settings then disable imaging unit low alert .. pls check below image for more clarity.


Factory reset for Samsung Printer SL-C1860FW


Factory reset for Samsung Printer SL-C1860FW


   I have found some info online and used it to reset my machine to factory settings. I share a explaining the steps. Hope this helps others, as I found it difficult to find this information anywhere online.


Factory reset for Samsung Printer SL-C1860FW


Press 1,2,3 on front panel of printer simultaneously


1. Enter password 1934 and select “Ok”


2. Select “Test Routine”


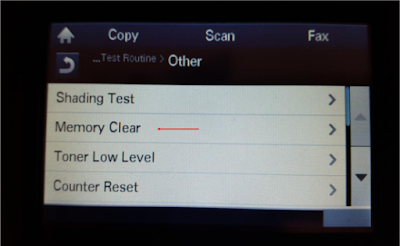
3. Select “Other”


4. Select “Memory Clear”


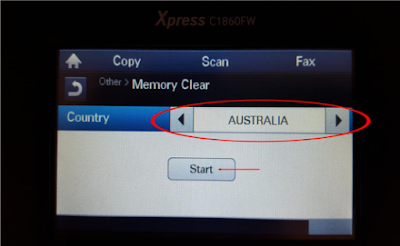
5. Select your Country of Residence and select “Start”


6. After clearing the memory, the printer will reset to factory settings and depending on its age will probably need a firmware update.


Why the output image is false?

 
Why the output image is false?


    Use of non-conforming printing paper; The carbon powder model is not compatible with the machine type or the powder carbon; Sensitive drum; There are parts loose in the description component; The scanning motor is not running smoothly, and there is a dithering phenomenon.


What's the reason of the printed image to white?


What's the reason of the printed image to white?


    Low surface potential; The problem of moisture or sensitive drum components of carbon powder; The surface potential is low after the exposure of the light-sensitive drum. Lack of exposure; Magnetic roll deflator; The transfer of electricity is low; Printed paper be affected with damp be affected with damp.


Featured articles

How to fix error 1313 in canon MX series Printers

How to fix error 1313 in canon MX series Printers Description The paper jammed as the machine pulled in the printed paper. Resol...

proposals and solutions for printer from eby